Please join me in congratulating Lauren Kondas, one of our Pastry Arts majors who are about to earn her Baccalaureate degree.
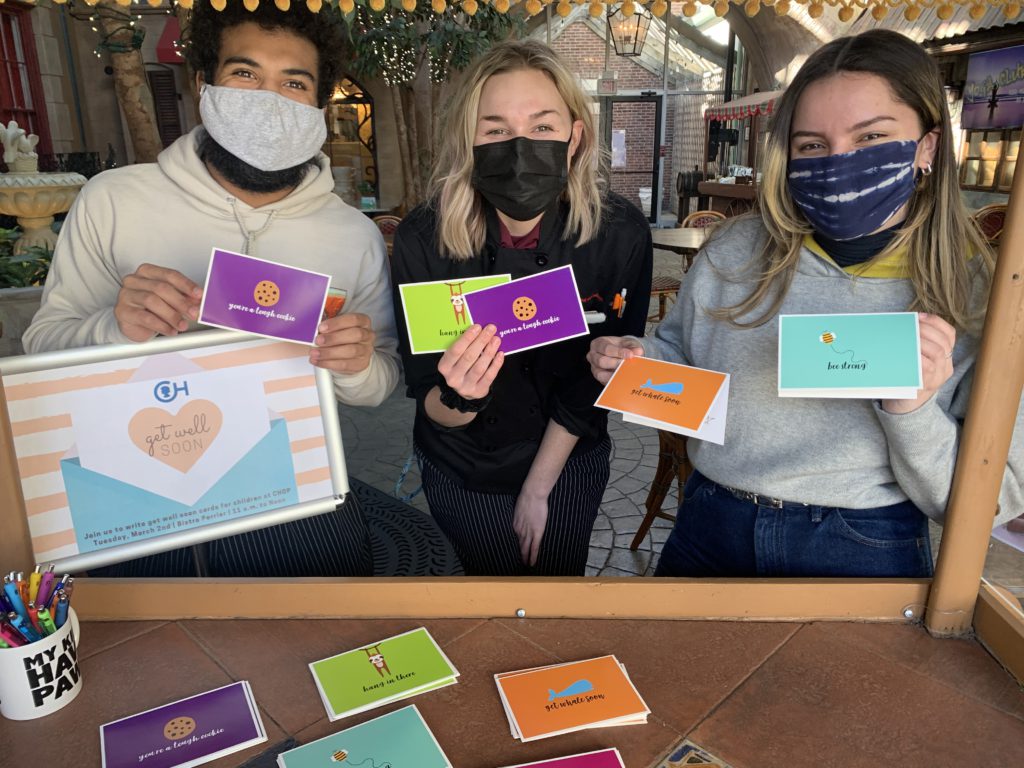
Lauren approached our Student Life team with an idea; create “get well” cards for the patients of the Children’s Hospital of Philadelphia (CHOP). The college hosted Lauren’s event on March 1, 2021. Everyone was thrilled at the care, creativity, and expressions of support from our students.
This event had a special place in Lauren’s heart. Her good friend is a patient of CHOP. Lauren notes that they took great care of him back then, and continues to care for him now.
CHOP is a special place. It is world-renowned for its advancements in pediatric medicine. Philadelphia and the whole country have reasons to be proud of CHOP. Walnut Hill College students and staff are proud of CHOP as a special neighbor. We are certain that the cards will bring smiles to the young people being cared-for at CHOP.
In recognition of Lauren’s thoughtful project, I am sending her a “President’s Commendation”. Along with her Baccalaureate degree and other experiences and achievements, it will enhance her professional portfolio.
As a student and a caring citizen Lauren sets a great example for us all!
Hey, everyone! This week, I wanted to share something that I like to make at home on a fairly regular basis and a recipe to use it in. Mushrooms are one of my all-time favorite foods, and I think that they make a great substitute for meat. They’re packed full of protein, fiber, and an immune-boosting antioxidant called selenium. I love the flavor that each different type of mushroom has, and they’re all different! Some of my favorites include shimeji, morel, maitake, oyster, and enoki. When caramelized, they have an incredibly nutty and rich flavor that adds depth to any dish. They’re pretty much one of the best foods ever, spoken by a completely unbiased individual… ????
I think that mushrooms are also beautiful to look at, and
for this reason and a few others, I like them to be recognizable in a dish. I
rarely cut mushrooms unless they are of the larger variety and cannot be torn.
I always tear the mushrooms previously mentioned, and I always save the ends
for stock and soup! Because mushrooms are so incredibly versatile, I really
like to keep some already cooked off in my fridge for salads, pasta, or
whatever we’ve got a hankering for. One of my favorite preparations for these
fungi is to caramelize them in brown butter. They turn out to be incredible
little flavor bombs that you can add to any dish. You could absolutely
substitute out butter for a preferred cooking fat to get the same lovely color.
This is as simple as cutting a few knobs of butter onto a sheet pan, browning
the butter in the oven, and mixing your cut mushrooms with some salt for
seasoning into the brown butter. Once they’re all coated, roast them in the
oven at 350 degrees Fahrenheit until they’re well fragrant and golden brown.
One recipe that I’ve developed to use these in is my take on spaghetti ai funghi. Mushrooms that have been browned lend themselves nicely to a cream sauce or something that will push the rich flavor forward. The recipe is very simple, but in the video I have included, I used a red wine jus I made from chicken stock (not necessary, but it’s what I had). Using regular chicken stock works perfectly well for this recipe and is usually what I do. It is also perfectly fine in this recipe to brown the mushrooms in a pan first and then build your sauce from there.
Ingredients:
¼ lb. enoki mushrooms
¼ lb. shimeji mushrooms
¼ lb. oyster mushrooms
8 oz. dry spaghetti
1/3 cup chicken stock
¾ cup heavy cream
Fresh cracked black pepper to taste
Parsley (I toasted mine for a little texture)
1 tbsp. butter
1 egg yolk
Procedure:
Salt a large pot of water and bring to a boil.
Prepare your mushrooms by tearing them apart.
Brown the butter in a sauté pan and add the mushrooms.
Once the mushrooms are tender and caramelized, deglaze with chicken stock.
Reduce the chicken stock down until it becomes syrupy and add the heavy cream.
Reduce the heavy cream until it just starts to thicken and coats the back of a spoon.
Cook your spaghetti to al dente and add to the cream sauce with a splash of pasta water.
Separate one egg, store the whites, and keep the yolk out.
Once the pasta is coated with sauce, season to taste with salt, cracked black pepper, and parsley.
Finish the dish while still hot by stirring in an egg yolk. (The residual heat cooks the yolk without turning it solid.)
When I first started making this recipe, I was in love. It’s
a fairly simple dish to make and it tastes so luxurious. You really don’t need
a lot of it to fill you up, and it has an outstanding roasted mushroom flavor.
I like to go heavy on the cracked black pepper because it adds a nice spice to
the very rich dish. I hope that this has inspired you to cook with mushrooms
more and maybe even try them as a substitute in your favorite meat dish. I
guarantee you’ll be surprised at just how flavorful they are! Thank you for
reading and happy cooking!
Hey, everyone! This week’s blog post is the first
collaboration post we’ve done on here! A fellow student leader, Meghan Young,
wrote a piece that I think totally captures the idea of what this blog is all
about. What better way to kick off a collaboration than with a gameday post?
It’s always fun having people over to watch sports, whether it’s football,
basketball, soccer, you name it! Once you’ve gotten everyone together, the
question of what to eat and drink always arises. Planning can really elevate the
gameday experience, and in this post, we’re going to share some recipes that
are perfect for groups of people!
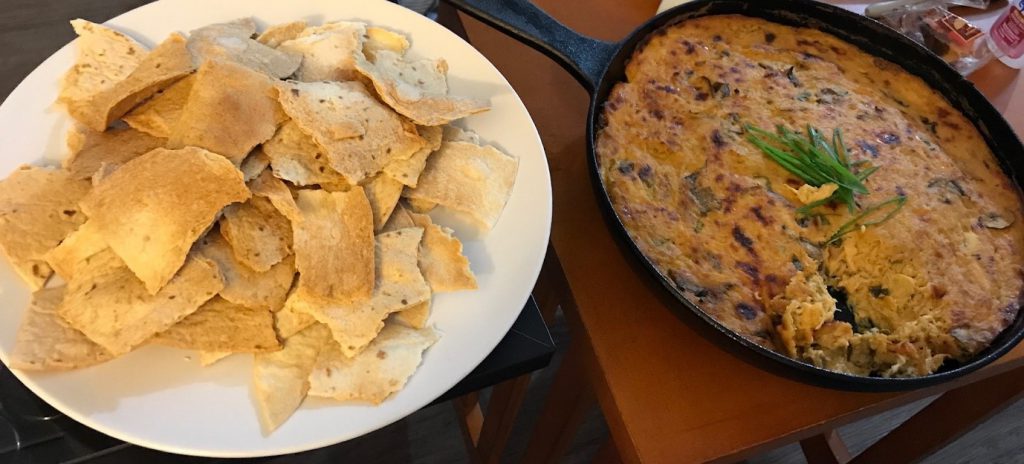
One recipe that I’ll often make at home is chicken dip. It is so incredibly easy to put together and is usually a hit once it’s done. Buffalo chicken dip is a classic, but I like to put my own twist on chicken dip. I recently discovered a barbeque sauce that goes beautifully with chicken and thought, why not make dip with this? Thus, my barbeque chicken dip was born. Something fun about this recipe is that you can really substitute in any favorite sauce for barbeque and it will work just as well. I find that sweeter sauce doesn’t work as well for this dip based solely on the fact that I don’t like my savory foods to be too sweet. There really aren’t a ton of ingredients in this dip, which makes it very user friendly.
Barbeque Chicken Dip Ready for Game Day Action!
Ingredients:
1 rotisserie chicken
2 cups barbeque sauce
1 pound cream cheese
½ cup sour cream
2 cups shredded cheddar cheese
1 cup spring onion
Procedure:
Shred rotisserie chicken with hands or forks.
Warm barbeque sauce in a pan, and add softened
cream cheese and sour cream.
Mix in chicken and three fourths of the shredded
cheese and spring onions.
Once combined, taste and adjust seasoning, if
necessary.
Spoon into a 10-inch skillet, and top with the
remaining cheese.
Bake in a low oven until heated through and
bubbling.
*OPTIONAL* Broil on high until cheese gets
bubbly and brown on top.
Garnish with remaining spring onions, and serve
with chips.
I hope you all enjoy this recipe as much as I do! Whenever it’s movie night or I know people will be coming over, I throw this together and it’s always a hit. Remember that you can really make any kind of chicken dip, and you should definitely experiment with flavors! Thank you for reading!
Hey, everyone! This week, I wanted to share something that I have been making quite a lot of recently. Ever since I was younger, I have absolutely loved pita bread. Whether it’s stuffed full of falafel or dipped in hummus, I can’t get enough. Ever since I stumbled upon a great recipe developed by Paul Hollywood, I’ve been making it all the time! I make quite a lot of hummus at home, and it’s fantastic to have a scratch-made lunch of pita, hummus, and salad. I think that working with this recipe has taught me a lot about proving dough and the process of making flatbread. I also learned a lot from a friend of mine here at school, who is incredible at making Mediterranean food. I’m still trying to perfect my pita, but I’ve had a ton of fun with the process of making it and learning how to get the perfect pocket.
I have tried a few different ways of making pita bread, but I have definitely found that the oven works best. When first making pitas in class, I tried making them on the back of a very hot cast iron pan. I would flip them halfway through, and the results were pretty decent. However, the pitas were never evenly colored, even though they had nice pockets. After doing some research, I found that my only other option really was an oven. A deck oven would definitely be the best choice for this, but sadly, I don’t have one of those at home. To simulate this, however, I cranked my oven up to 550 degrees Fahrenheit and preheated my baking trays to somewhat mimic the effect of heat from the top and bottom evenly. As this is essentially the same as heat cleaning your oven, please make sure that your oven is already clean if you’re going to try this. Greasy ovens at a high heat billow smoke and smell horrible. This proved to work very well but needs constant monitoring, seeing as though the pitas bake very quickly. That being said, I still achieved some good pockets and nice color!
This was another one of those projects that felt good to work on and get better at. I tried making a preferment for my dough to get some extra flavor out of it, and I really liked the way it turned out. I find that homemade food tastes better and is much more rewarding if you have the time and patience. I always have fun making recipes like this, because it becomes part of a hearty meal later on. For the sake of people who would like to try making this pita recipe, I have included it here. I hope this has inspired some of you to go out there and bake! I’ve definitely caught the bug and am looking forward to more fun bakes. Thank you for reading!
Hey, everyone! This week, I wanted to focus on a recipe that would help me with minimizing my waste. This is something that I have been interested in for a while, as I’m always learning new ways to use things people usually consider “waste”. I recently learned a very interesting way to use the chickpea water in canned chickpeas. For the longest time, I discarded this and thought nothing of it. As it goes, aquafaba, or chickpea water, makes a fantastic meringue and, furthermore, great meringue cookies! My first attempt at this was without a recipe and did not turn out well at all. My second attempt, however, turned out great, based on a recipe I found online. I was shocked at the stability of this meringue and the fact that it was so silky and fluffy! This would make a fantastic icing or base for a vegan sponge. I was ecstatic after making this recipe, and I couldn’t wait for my meringues to finish baking.
I’d also had an idea for a plated dessert that I wanted to make for my wife. I had some peach butter that I had jarred over the summer and some raspberries in my fridge, so I went out, bought some coconut whipped cream, and made my version of a vegan pavlova. I was thrilled with the outcome and would absolutely make it again! This was such an incredibly cool experience for me, and I learned a lot about vegan baking. I love the fact that I can use part of a product I would usually throw away to make something delicious and beautiful. This could not have been a better experience for me, and I will absolutely be using this more and more in my cooking. I hope that you enjoyed this post. Thanks for reading!
Two Walnut Hill College Student Leaders, Joshua Reilly and Meg Linck, prepare a pre-Thanksgiving meal at the Clyde F. Barker Penn Transplant House, along with other members of the Student Leadership Development Institute. Photo credit: The Philadelphia Inquirer
On Tuesday, November 26, members of the Walnut Hill College Student Leadership Development Institute visited the Clyde F. Barker Penn Transplant House to prepare a pre-Thanksgiving dinner for residents of the transplant house and their families. This was the 7th meal in a partnership between the College and the Transplant House, all in an effort to engage WHC students with members and organizations of the University City community in a meaningful way.
The Philadelphia Inquirer wrote about this year’s Thanksgiving dinner, and we are happy to share their article, written by Mari A. Schaefer, both here and below:
Students at the Restaurant School at Walnut Hill College prepared a full Thanksgiving dinner with all the trimmings for patients and families who were staying at the Clyde F. Barker Penn Transplant House, where guests wait for or recover from an organ transplant.
The facility celebrated the holiday in the past with either a potluck or a catered meal, said Kirsten King, director of the 13-room guesthouse, located on 3940 Spruce St. In addition to doing all the cooking this year, the students sat with the guests to help celebrate, she said.
“They have been really enthusiastic collaborators,” said King. Residents of the Transplant House have been known to stay for as long as eight months during recovery, she said. So the homemade meal, which was funded with grants from Penn Medicine and the Transplant Institute, means a lot to them.
Added King, “We even asked them to make extra,” so that leftovers could be served on another night.
Video credit: Walnut Hill College Student Leader Steven Walsh
The Student Leadership Development Institute began a new partnership with the Clyde F. Barker Penn Transplant House on Spruce and 38th Streets about 14 months ago. If you are unfamiliar with the Clyde F. Barker Penn Transplant house, the house is not a medical facility, but rather a small guest house designed to meet the unique needs of transplant patients and their families during a trying time in which they wait for a transplant to be approved.
Initially, Dr. Julia G. Lavenberg, who is a Research Analyst for the Penn Medicine Center for Evidence-Based Practice, reached out to me, along with the Manager of the Transplant House, Kirsten King, with an opportunity of a potential long-term partnership involving what we do best: providing exceptional hospitality and food. The overall idea was for Walnut Hill College and, more specifically, the Student Leaders to plan, prep, and provide delicious meals for the patients, families, and friends residing at the Transplant House on a monthly basis. Needless to say, this was a fantastic opportunity for the college to partner with a nearby university in the community and, specifically, for our Student Leaders and the Student Leadership Development Institute to be at the center of the partnership…and we said yes.
Since the partnership began, these Student Leaders have planned, prepped, and provided seven different meals to the families and patients of the Clyde F. Barker Penn Transplant House, each meal with its own menu and its own theme. From garlic knots to focaccia, from Italian wedding soup to baked potato soup, and from snickerdoodles to berry pie, the patients, families, and friends of the Transplant House were treated to home-cooked meals and the incredible aromas that came with them.
Needless to say, I am extremely proud of this partnership and of our Student Leaders for delivering such an amazing experience to the guests of the Clyde F. Barker Penn Transplant House, and we are beyond excited in continuing this partnership for years to come!
Written by Dr. Joshua Seery, Director of the Walnut Hill College Student Leadership Development Institute
Hey, everyone! I hope that you’ve all had a good Thanksgiving. This week, I wanted to share something a little different from the usual content I post. On Tuesday, the 26th of November, a few of the Student Leaders and I went to the Clyde F. Barker Penn Transplant House to provide a meal for the people staying there. As a team, the Student Leaders organized and put on a dinner for the residents, and it turned out to be an incredible experience. We chose to do a Thanksgiving theme for our dinner and made roast turkey, mashed potatoes, roasted vegetables, apple and pumpkin pies, and other dishes to represent the holiday. There turned out to be loads of leftovers, but this made it so that people could pack lunches and dinners, if need be. It feels like a great opportunity to be able to provide a meal for people who are busy throughout the day caring for their loved ones.
On a separate note, I feel as though everyone should experience something like this in their lifetime. It’s important to put emotion into cooking and provide an experience for someone who needs a little extra love. One of the first things I can remember my grandmother saying to me about her food was that she had a secret ingredient. Every dish that she made for us would taste just that extra little bit delicious because of this one thing. Every time I asked why it was so good, my grandmother would tell me that she put all her love into what she had made. I became convinced that this really was the key to delicious food. Food should be full of love and care for those meant to enjoy it. I think that people should remember this when preparing and serving food to anyone. You might just make someone’s night because of what you’ve worked so hard to prepare.
Below, I have included a short montage of the Thanksgiving dinner put on by the Student Leaders. You can even read all about it here in the Philadelphia Inquirer! I hope that even though this post was different, you could all enjoy it in a different sort of way. Thank you for reading this and sharing the experience with me!
Hey, everyone! This week, I was wondering what to do for a blog post, and a classmate of mine actually asked if I would make them some paneer. Paneer is a fresh cheese that comes from the Indian subcontinent. This quick and easy cheese has a number of uses and is delicious in many applications. This seemed like a good food to showcase, especially because I am a sucker for cheese! I went to a local market and picked out a gallon of whole milk for a two-pound yield of cheese. One of my all-time favorite dishes to eat that showcases paneer is Saag Paneer. A rich gravy of spinach and aromatics make up the sauce, and paneer soaks it right up, making for an irresistible combination. I really enjoy Indian cuisine, and over the years I’ve actually found that I like the vegetarian dishes better. In my opinion, paneer makes a fantastic substitute for meat and is easier on the stomach as well.
In my Canning, Jarring, and Preserving class here at WHC, I learned a great recipe for paneer that is very easy to execute. With only two ingredients, it is a procedural recipe that is very user-friendly. If you don’t quite get the separation of curds and whey the first time you add the lemon juice, you can always add more until you get the desired curds. Some important things to note are that when making any type of cheese, it is a good general rule to have cheese cloth or butter muslin on hand. A large sieve proves to be very helpful, as well as a half-sheet pan with a rack if you don’t have a proper cheese press. Something heavy such as a gallon of milk or heavy pans are good for pressing in a pinch. The following is the recipe I use from the class that I took. I think that it’s a good ratio and yield for milk to cheese. I really enjoyed making this recipe, and I hope that anyone reading does, too!
Ingredients:
1 gallon whole milk
½ cup lemon juice
Procedure:
Bring milk to a gentle, rolling boil.
Reduce heat to low, and stir in lemon juice.
Cook for 15 seconds, then remove from heat.
Stir gently to see separation (large curds),
then leave for 10 minutes.
Ladle curds into strainer lined with cheese
cloth.
Rinse curds gently with warm water to remove
lemon juice.
Tie off cheese cloth, and hang for 1-2 hours to
drain.
Place cloth-bound cheese on a sheet pan with a
rack, and apply 5 lbs. of pressure for 1 hour. (A cheese press can be used as
well.)
Remove cheese from cloth, and store for up to 2
weeks.
The beauty of a recipe like this is that you can easily change the batch size. The above recipe yields two pounds of paneer. Simply cut the recipe in half for a one-pound yield. Once you get the hang of making this, explore the many recipes that give paneer the showcase that it deserves. As previously mentioned, Saag Paneer is my favorite panir recipe, but there are most likely hundreds of recipes and variations to explore. Try substituting this in place of meat in a curry recipe. I’m sure the possibilities are endless, and I always have fun learning new ways to spice up ingredients that I love. I hope that you’ve enjoyed this post and that you now have a platform to follow your path to paneer perfection. Thanks for reading!
Hey, everyone! This week, I really
wanted to highlight one of my all-time favorite foods to make and eat. Since it’s
Napa cabbage and Joseon radish season, it’s the perfect time to make some
lovely Kimchi! Traditionally in Korea, a great harvest takes place during late
fall, when a year’s worth of Kimchi is made. This event, called Kim-Jang,
brings together an entire community for making hundreds and hundreds of heads
of Kimchi. This is then shared by families and community members. Kimchi is a
staple food in Korea, and what better way to use the harvest then to make lots
of it! Nowadays, most people make Kimchi for their families and most people’s
recipes and ratios differ from household to household.
One of the
reasons why I love Kimchi so much is that it’s incredibly versatile. It can be
used as a side dish, a base for soups or stews, stir fried, boiled, and so on.
When you get the hang of making Kimchi, you can start to experiment by adding
other ingredients that you like that are fit to ferment. In some parts of Korea,
you can find thinly sliced carrot in Kimchi as well as a certain type of
seaweed. A handful of chefs and culinarians in Korea and around the world have
taken it upon themselves to make Kimchi with just about anything. I recently
had pear Kimchi, which was actually really refreshing. I would say the most
important things about making Kimchi are to salt, wash, and drain your cabbage
well, have everything measured out and ready to use, and to really focus on
making a flavorful paste to smother your cabbage with.
I have been
lucky enough to taste some incredible Kimchi in the past few years and have
learned how to make a delicious, traditional Kimchi. This recipe can be
modified to make either Pogi Kimchi (whole cabbage) or Gat Kimchi
(cut-up cabbage). When I first learned about all the ingredients that go
into Kimchi, I was amazed at such a combination. My wife’s mom makes the most
incredible Kimchi, and learning what her secrets and procedures were really
inspired me to start making more at home. I would like to put a disclaimer out
there right now and say that I am not going to disclose exactly what goes into
the broth for my mother-in-law’s Kimchi. However, a simple broth of vegetables
and Dashima (also referred to as Kombu) works well for this and is what I will
include in the recipe. As silly as this may sound, this is another one of those
dishes in which you can really taste the love if you put in the time and
effort. People typically spend all day making Kimchi and will sometimes make
enough for months if not a full year. The recipe below is good for one head of
Napa cabbage. As the weight of a cabbage does range, I’ll also say that the
cabbage should weigh about three pounds.
Ingredients:
1 head Napa cabbage
1 Joseon radish
2 bunches spring onions
1 cup red pepper flakes
½ cup anchovy fish sauce
¼ cup salted shrimp
3 tablespoons sugar
1 onion
½ head of garlic
1 thumb of ginger
1 jalapeño (optional)
½ cup sweet rice
3 cups seaweed and vegetable broth
Procedure:
Cut cabbage into quarters and submerge in a
brine of 1 part salt and 10 parts water.
Leave in brine for 12 hours, then remove and
wash thoroughly.
Let the water drain from the salted cabbage for
2 hours in a colander.
Take any trimmings from the cutting process and
make a stock with that, 2 slices of Dashima, and 4 cups of water.
Reduce the broth down to 3 cups, strain, and
make sticky rice paste.
Boil, then simmer rice until a paste and cool.
In a food processor, blend the onion, garlic,
ginger, and jalapeño, if using.
Once blended into a paste, add to a mixing bowl
and combine with salted shrimp, fish sauce, sugar, and red chili flakes to make
the paste.
Cut spring onions into 2-inch pieces.
Julienne
the Joseon radish after scrubbing the outside of it. Do not peel.
Add
radish and spring onion to the paste and prepare a workstation that can handle
a potential mess.
Between
each layer of cabbage leaves, smear the paste and make sure to cover every part
of the cabbage.
Place
these smothered cabbage quarters in a container and let sit out 1-3 days, depending
on how sour you want your Kimchi.
Your
Kimchi is now ready to eat!
A few pointers for making Kimchi are that you want to let
the radish and the paste sit together for about half an hour before using on
your cabbage. Also, it’s important to recognize that Kimchi keeps fermenting in
your fridge, so you don’t want it sitting out of the fridge for too long. For
most beginners who have never tried Kimchi, I would recommend letting it sit out
for 1 day and then refrigerating it to maintain a slow fermentation. I always
love making this, and I hope this recipe gives people the ability to make some
proper, delicious Kimchi. Thank you for reading and have a great week!
Hey, everyone! The time has finally come for my cheese to be tasted! After two and a half months, I just couldn’t wait any longer. I knew that during the process of aging, my cheese formed a somewhat deep rind and dried out probably more than I had wanted it to. I amended this problem quickly enough to save the cheese from cracking though, and I’m really pleased with the result. While it is drier than I had seen in other results, it is still creamy for a semi-hard cheese. The color and texture are very much like gruyère and share a very similar flavor profile as well. If I could describe its flavor in three words, those words would be nutty, milky, and tangy. I think that with age, the tangy characteristic would turn into the mild sharpness that a comté or gruyère has. This was by far one of the most eagerly awaited things I’ve ever made. Hopefully, in the near future, I’ll be able to enjoy my blueberry wine with my tomme-style cheese!
Above is some footage of the cheese after I split it in two, then four. Looking back at all the photos I’ve taken during this process makes me feel lucky to have learned so much about this craft. I really appreciate the beautiful cheese press that Chef Slonaker made, and for inspiring me to really pursue this. After finally finishing this first cheese, I’m really hungry for more, and I hope to share more cheesemaking adventures on here. I really urge you all to try making that one thing you love to eat. Try learning how to do that thing you’ve always thought about doing. I’m someone who’s all too familiar with putting things like this off, but this was one of the most rewarding culinary experiences I’ve ever had. I’m very eager to start another project and to apply what I’ve learned from this run to the next. One of my favorite things in life is to learn something new, and I’m glad that I got to document and share my experience!
 Barbeque Chicken Dip Ready for Game Day Action!
 Steven Walsh
 Meghan Young